Changelog
-
Text-to-lottie now supports native text rendering and editable text slots. Scenes can include real fonts, text slots appear in the properties panel, and edits update the canvas instantly on commit. Exports bundle fonts alongside the Lottie JSON.
npx skills add diffusionstudio/lottieNative text and editing
The player renders font-backed Lottie text natively. Text slots show up in the properties panel with their current values. Change the text and the canvas updates instantly. Colors and numbers work the same way.
One control can drive multiple slots at once using grouped targets. Repeated text like brand names, dates, or CTAs stays in sync from a single field. Grouped slots are hidden from the panel so they do not clutter the UI.
 0:00 / 0:00
Templates
Generate a Lottie template once, then reuse it by changing the content from the properties panel. Swap the headline, description, colors, and export a new version without regenerating the animation.
 0:00 / 0:00
Same brand, different composition. Existing scenes give the skill context to produce new ones that stay consistent.
 0:00 / 0:00
What else is new
- Multiline text wrapping using box text for longer copy
- Unicode safe text persistence for accented characters, symbols, and special characters
- Ordered slot controls in the properties panel
- Bug fixes
-

A big upgrade to the text-to-lottie skill. Better design taste, better motion, fewer random design decisions, and fewer refinements. Simple prompts now produce polished, production ready Lottie animations with Claude Code, Codex, or Cursor.
npx skills add diffusionstudio/lottieBetter design taste
The skill now produces less generic output. Typography is cleaner, spacing is tighter, and layouts feel more intentional. When no brand is provided, the skill defaults to a premium contrast palette instead of generic gradients and random color choices. The result is output that looks designed, not generated.
Chapterized animations
Animations can now span multiple sequences with proper transitions between chapters. Each chapter has its own timing, composition, and motion, and the seams between them are handled automatically. This makes it possible to build longer, more structured animations from a single prompt.
Stronger motion
Motion taste is one of the biggest improvements. Better staggering, better keyframe offsets, better timing, and better coordination between multiple animated properties and objects. The motion feels choreographed, not like everything moves at once. Easing anchors give the skill a vocabulary for describing motion behavior, so results are more consistent across different types of animations.
 0:00 / 0:00
More examples
Simple prompts now produce better results across different use cases. Copy text from a post, ask the skill to animate it, and get a polished Lottie with proper layout and motion.
 0:00 / 0:00
Output comparison
Same one shot prompt. The updated skill produces significantly different results. These two examples show how much the upgrade changed output quality.
Before
After

What else is new
- Skill routing and parallel agent orchestration for faster generation
- Stronger design QA catches layout and spacing issues before output
- Improved icon animations
- Behavior based easing anchors for more consistent timing
-

Text-to-lottie v1.0.0 is stable. It is now a full framework for creating and managing Lottie animations with coding agents like Claude Code and Codex. The interface has been completely rebuilt with two major new capabilities. Multiple project workspaces and drag and drop Lottie import.
npx skills add diffusionstudio/lottie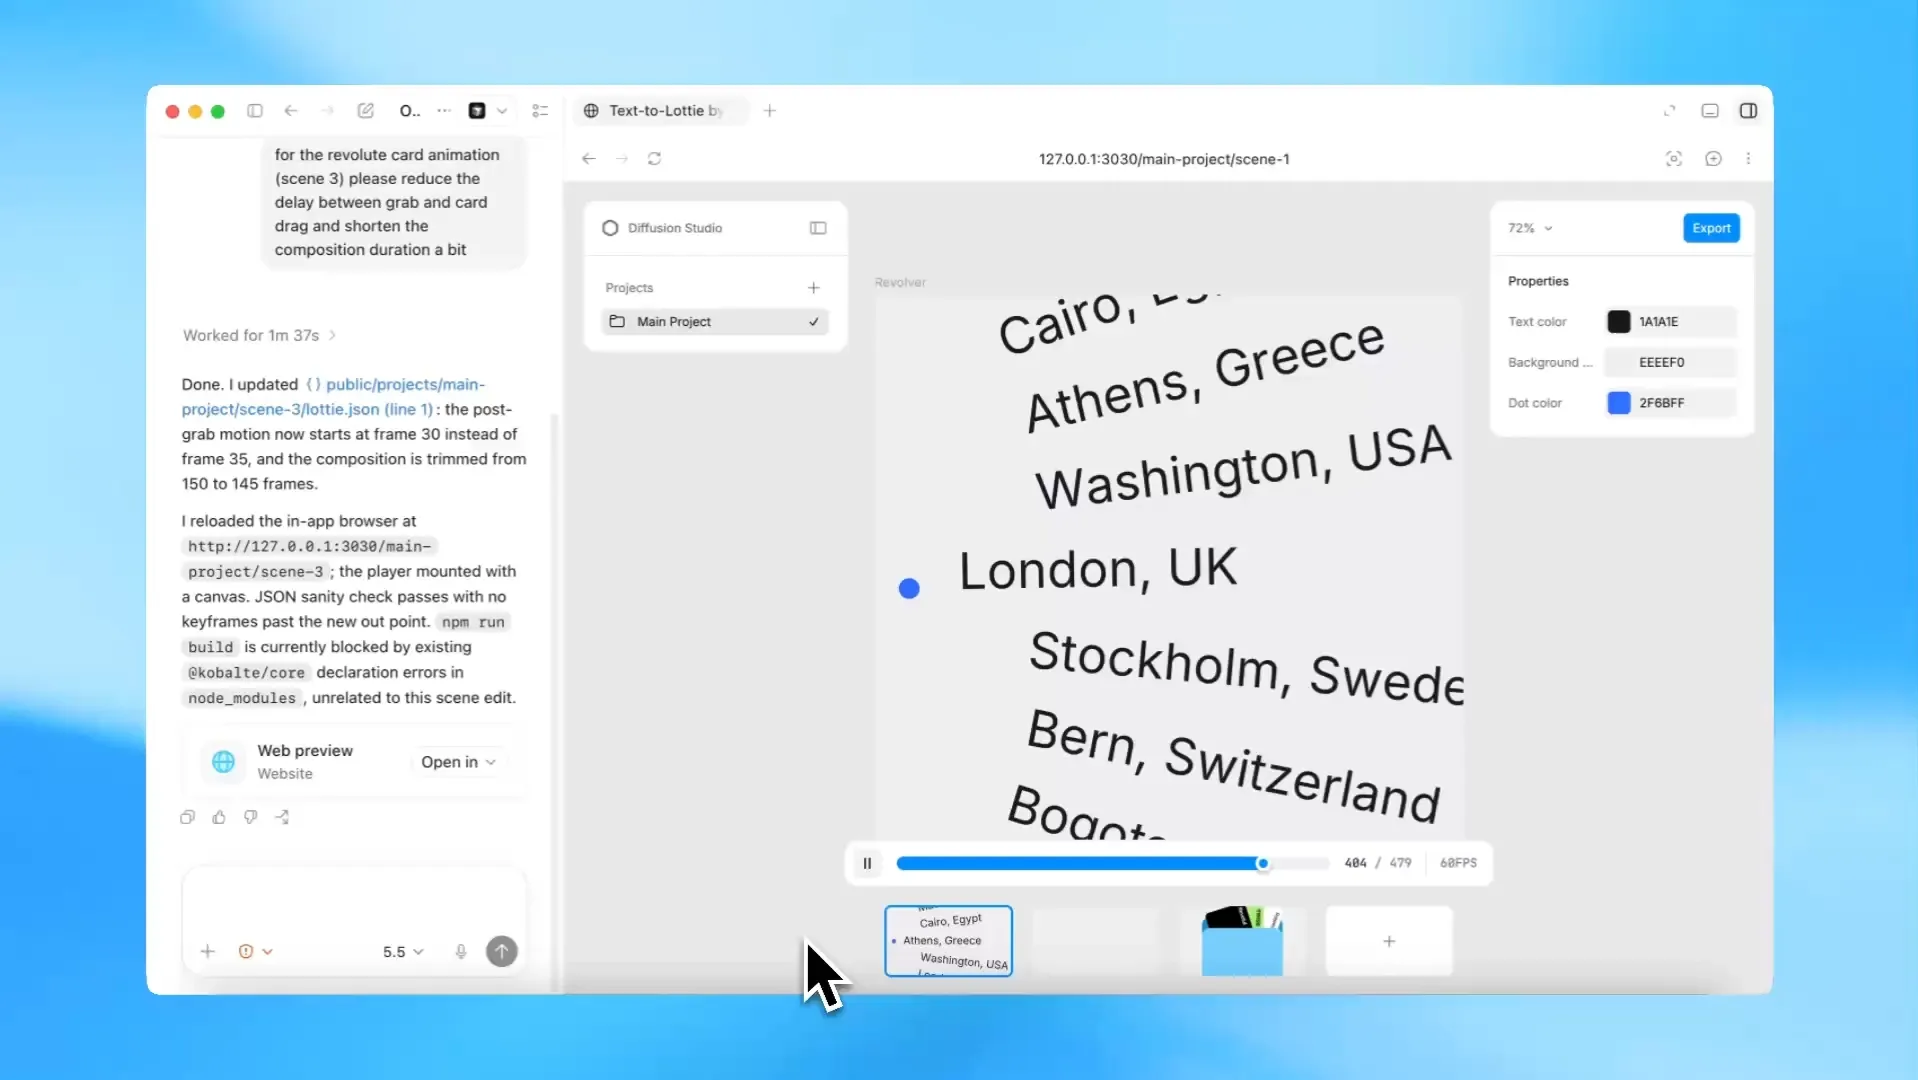 0:00 / 0:00
Projects and scenes
Animations are organized into projects and scenes. Each project holds multiple scenes, and each scene is its own Lottie JSON file. Create size variants of an animation, explore different color treatments, or build a set of related scenes and combine them into a new composition. The agent manages everything within one workspace. No need to set up separate installs or juggle files across directories.
Drag and drop import
Any existing Lottie JSON file can be dropped onto the canvas and imported as a scene. Import the same file multiple times to create independent copies and adjust each one differently, or import multiple files and refine them individually. This makes the framework an editor for existing Lottie work, not just a generator.
Open source
Text-to-lottie is MIT licensed and open source. Contributions are welcome. View the code, open an issue, or submit a PR on GitHub.
-
 0:00 / 0:00
We released text-to-lottie, an open-source skill and harness for generating production-ready Lottie animations with coding agents. Install it and describe what you want. The agent builds the animation.
npx skills add diffusionstudio/lottieHow it works
The skill sets up a workspace with a built-in player. Each animation lives as a scene inside a project, and scenes load automatically from
public/projects/<project>/<scene>/lottie.json. As the agent edits, the player live-updates so you can inspect, scrub, and refine the result in real time.The agent handles the full Lottie spec. It creates layers, shapes, keyframes, easing curves, and group transforms directly in JSON. You describe the motion, and the agent writes the file.
What it’s good at
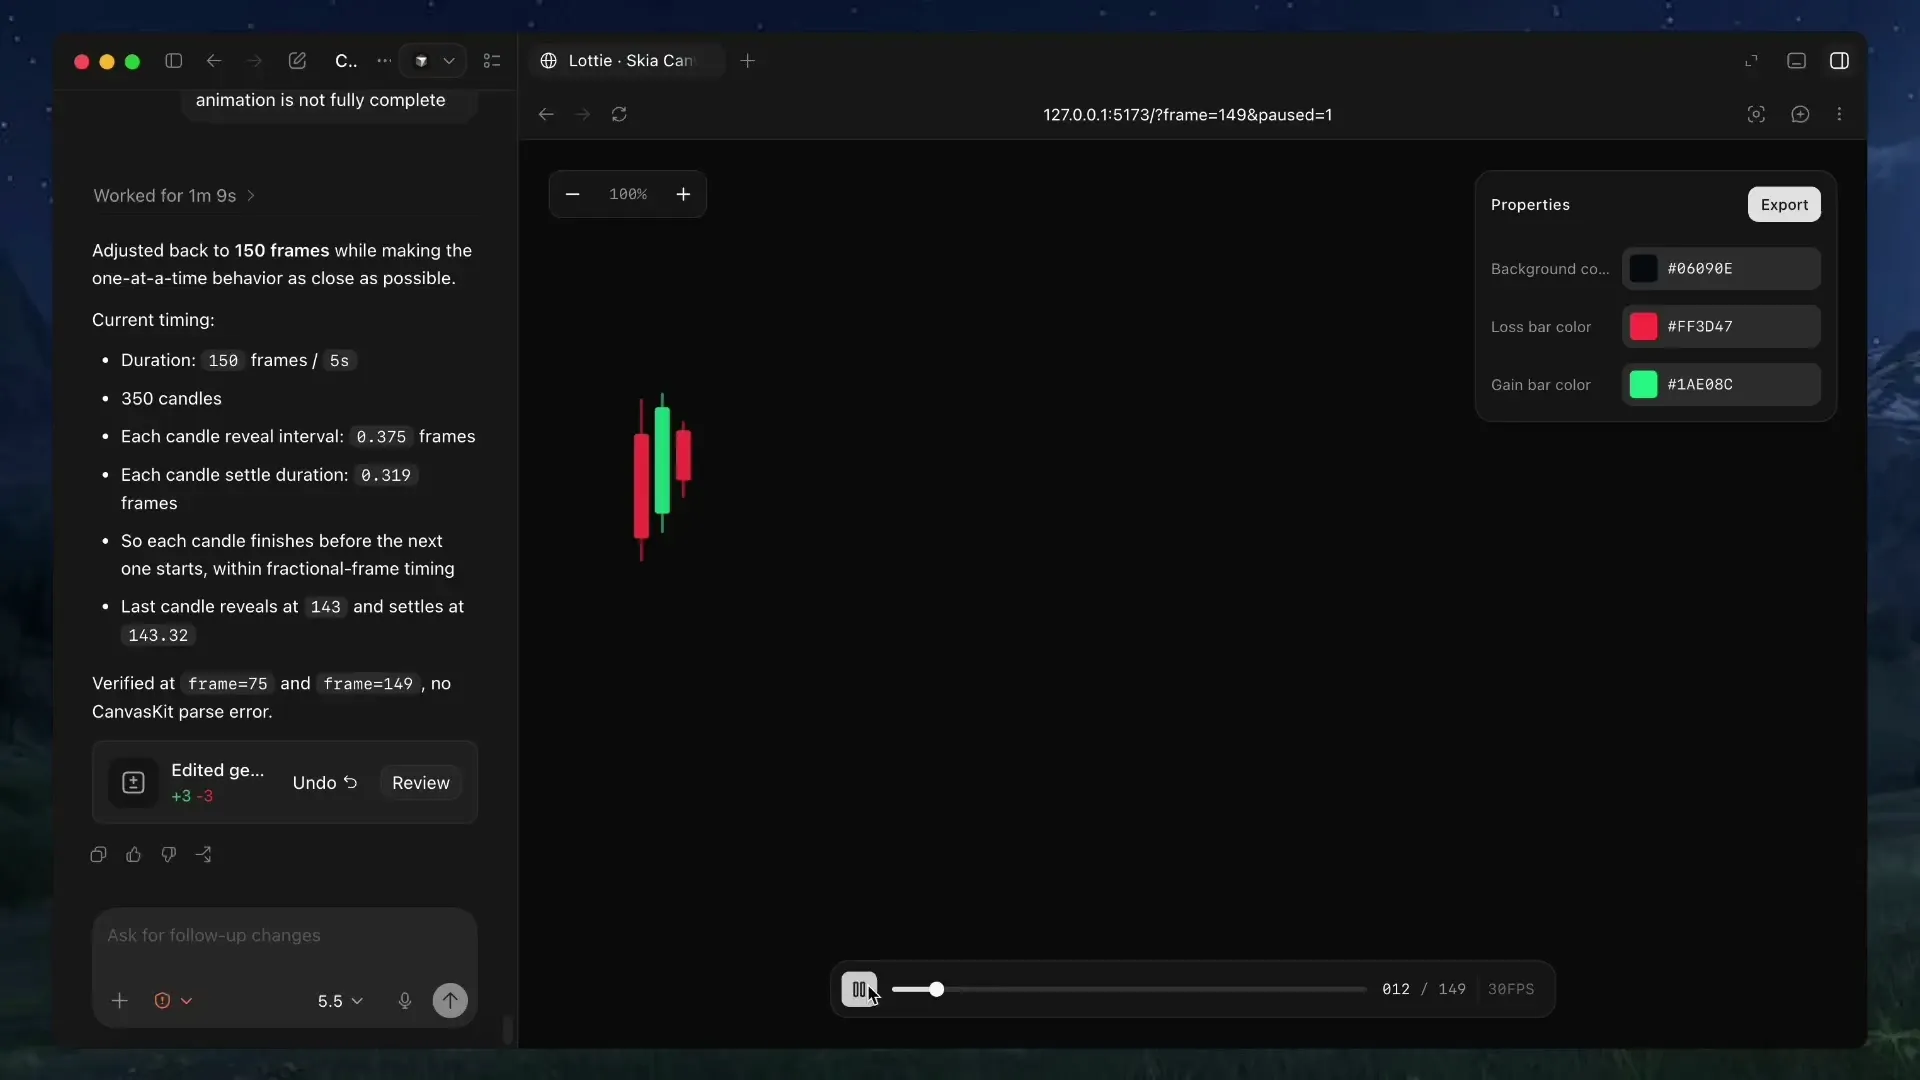
Text-to-lottie works best for short, single-scene animations and motion graphics. It is especially effective for animating SVGs and creating data-driven animations. The agent excels at generating Lottie files algorithmically from structured data, whether that is a candlestick chart with hundreds of data points or a logo reveal with precise trim-path timing.
Prompt tips
Getting good results comes down to how you prompt. A few principles that make a difference:
- Ground the model. Provide SVGs, real-world data, or screenshots whenever possible. Results are significantly better when the animation is based on concrete assets.
- Use motion design terminology. Describe timing and movement with terms like ease-in, ease-out, and ease-in-out. The agent understands these and translates them directly into Lottie keyframe curves.
- Think like a camera operator. Include camera pushes, pans, zooms, and rig-like motion in your prompt. The agent simulates these through group transforms.
- Request the controls you need. By default, outputs usually only expose a background color control. If you want to customize other properties, ask the agent to create controls for them.
- Specify FPS and duration. If your animation requires a specific frame rate or length, include the desired FPS and total frame count in the prompt.
Example prompts
Here are a few prompts that show what is possible:
A premium fintech Lottie of a transparent-background candlestick chart with 350 real TSLA-style red/green candles revealing rapidly left to right; each slim candle grows vertically into its OHLC body and matching-color wick, with tight spacing, natural clustered volatility, no grid or labels, and a single parent camera group that briefly holds then pans smoothly with ease-out motion across the forming market trend in a 150-frame, 30 FPS composition.
Create a Lottie animation from the Spotify SVG logo where the circular mark pops in, the three internal mark strokes draw on with trim-path animation, and the wordmark characters rise from below while fading in sequentially. Add editable Skottie slots for the logo color and mark stroke width, with preview controls for both.
Create a Lottie animation from the SVG path in github.com/JaceThings/SF-Hello/blob/main/SVG/hello-en.svg. Reveal the path with an animation that follows the natural path direction. Apply a premium apple themed gradient to the path. Use ease-in-out timing, a transparent background, and preserve the original SVG geometry.
Use anywhere
The generated Lottie JSON files work everywhere Lottie is supported. Use them on the web with lottie-web, in React Native, iOS, Android, or Flutter. They can also be imported into After Effects for further refinement.
Open source
Text-to-lottie is open source. View the code, prompt guide, and examples on GitHub.
- Version 0.128.4
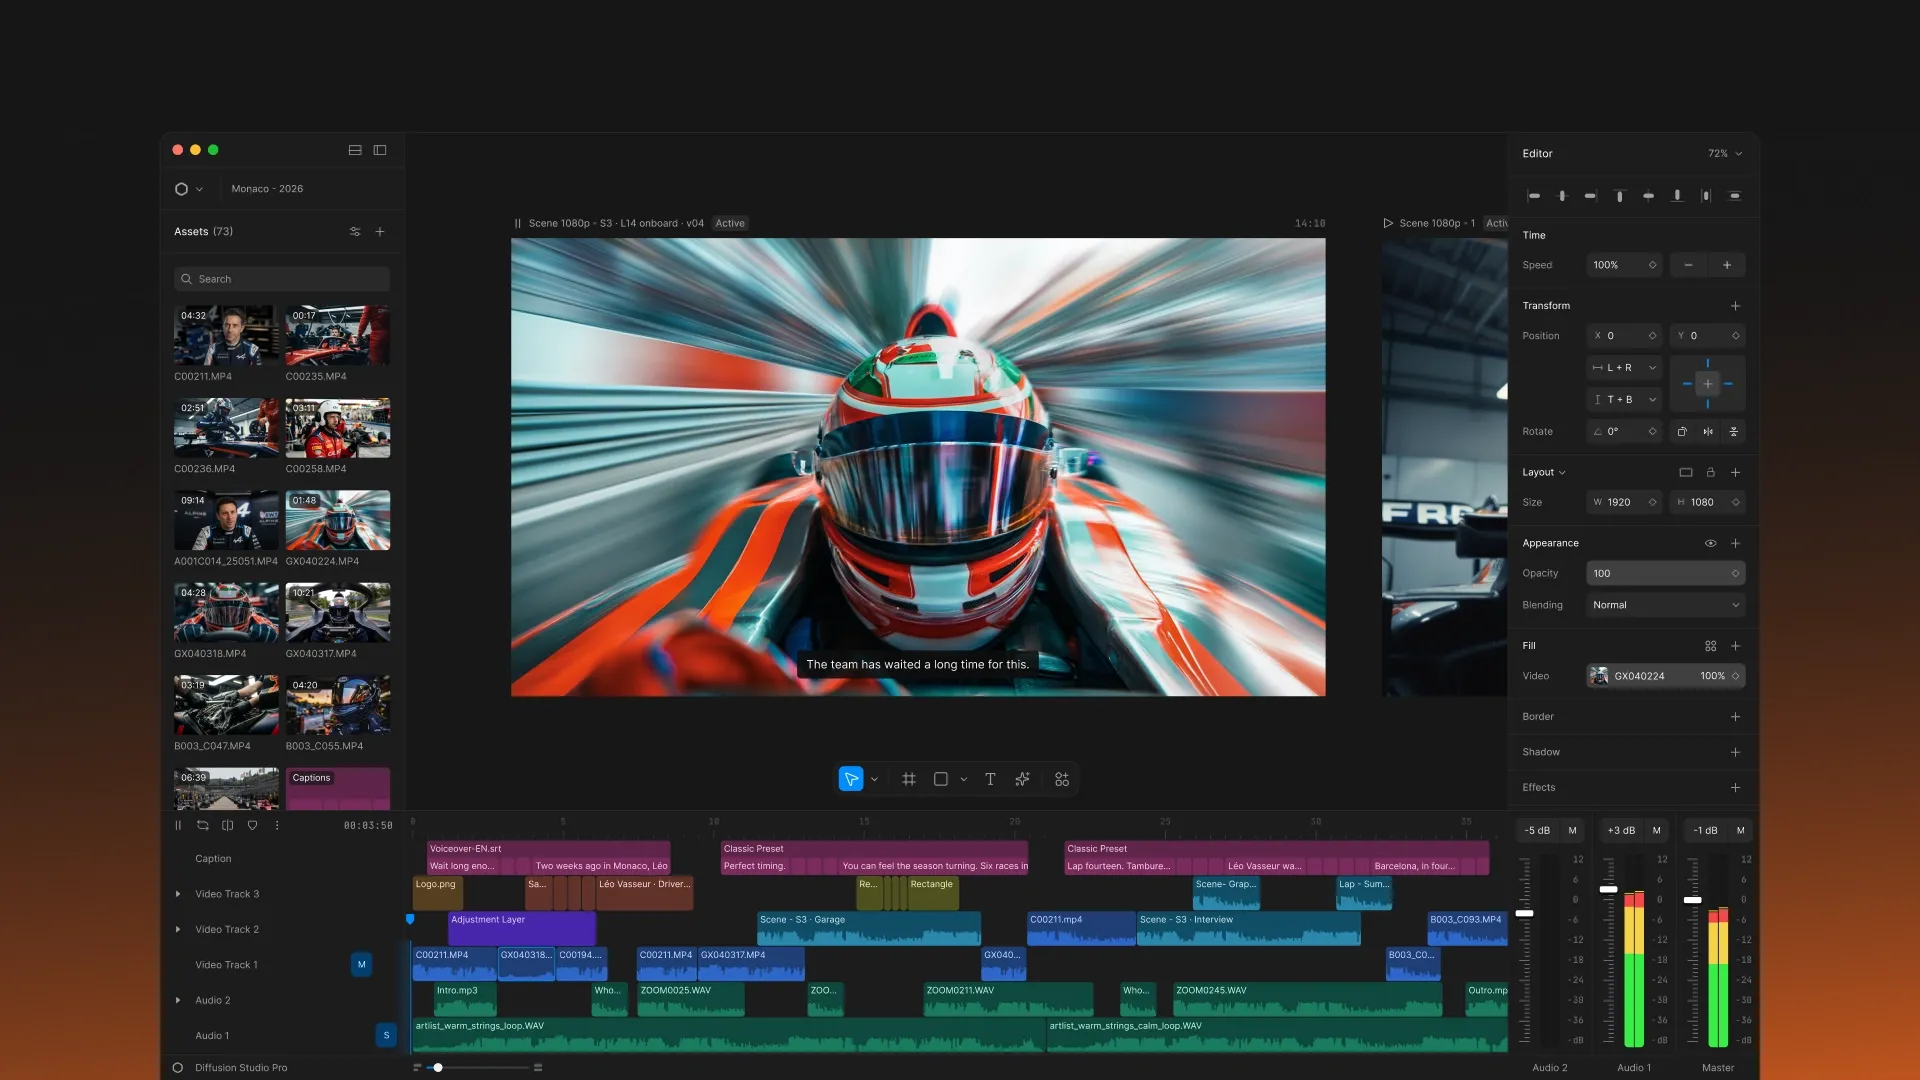
Timeline groups and layers
 0:00 / 0:00
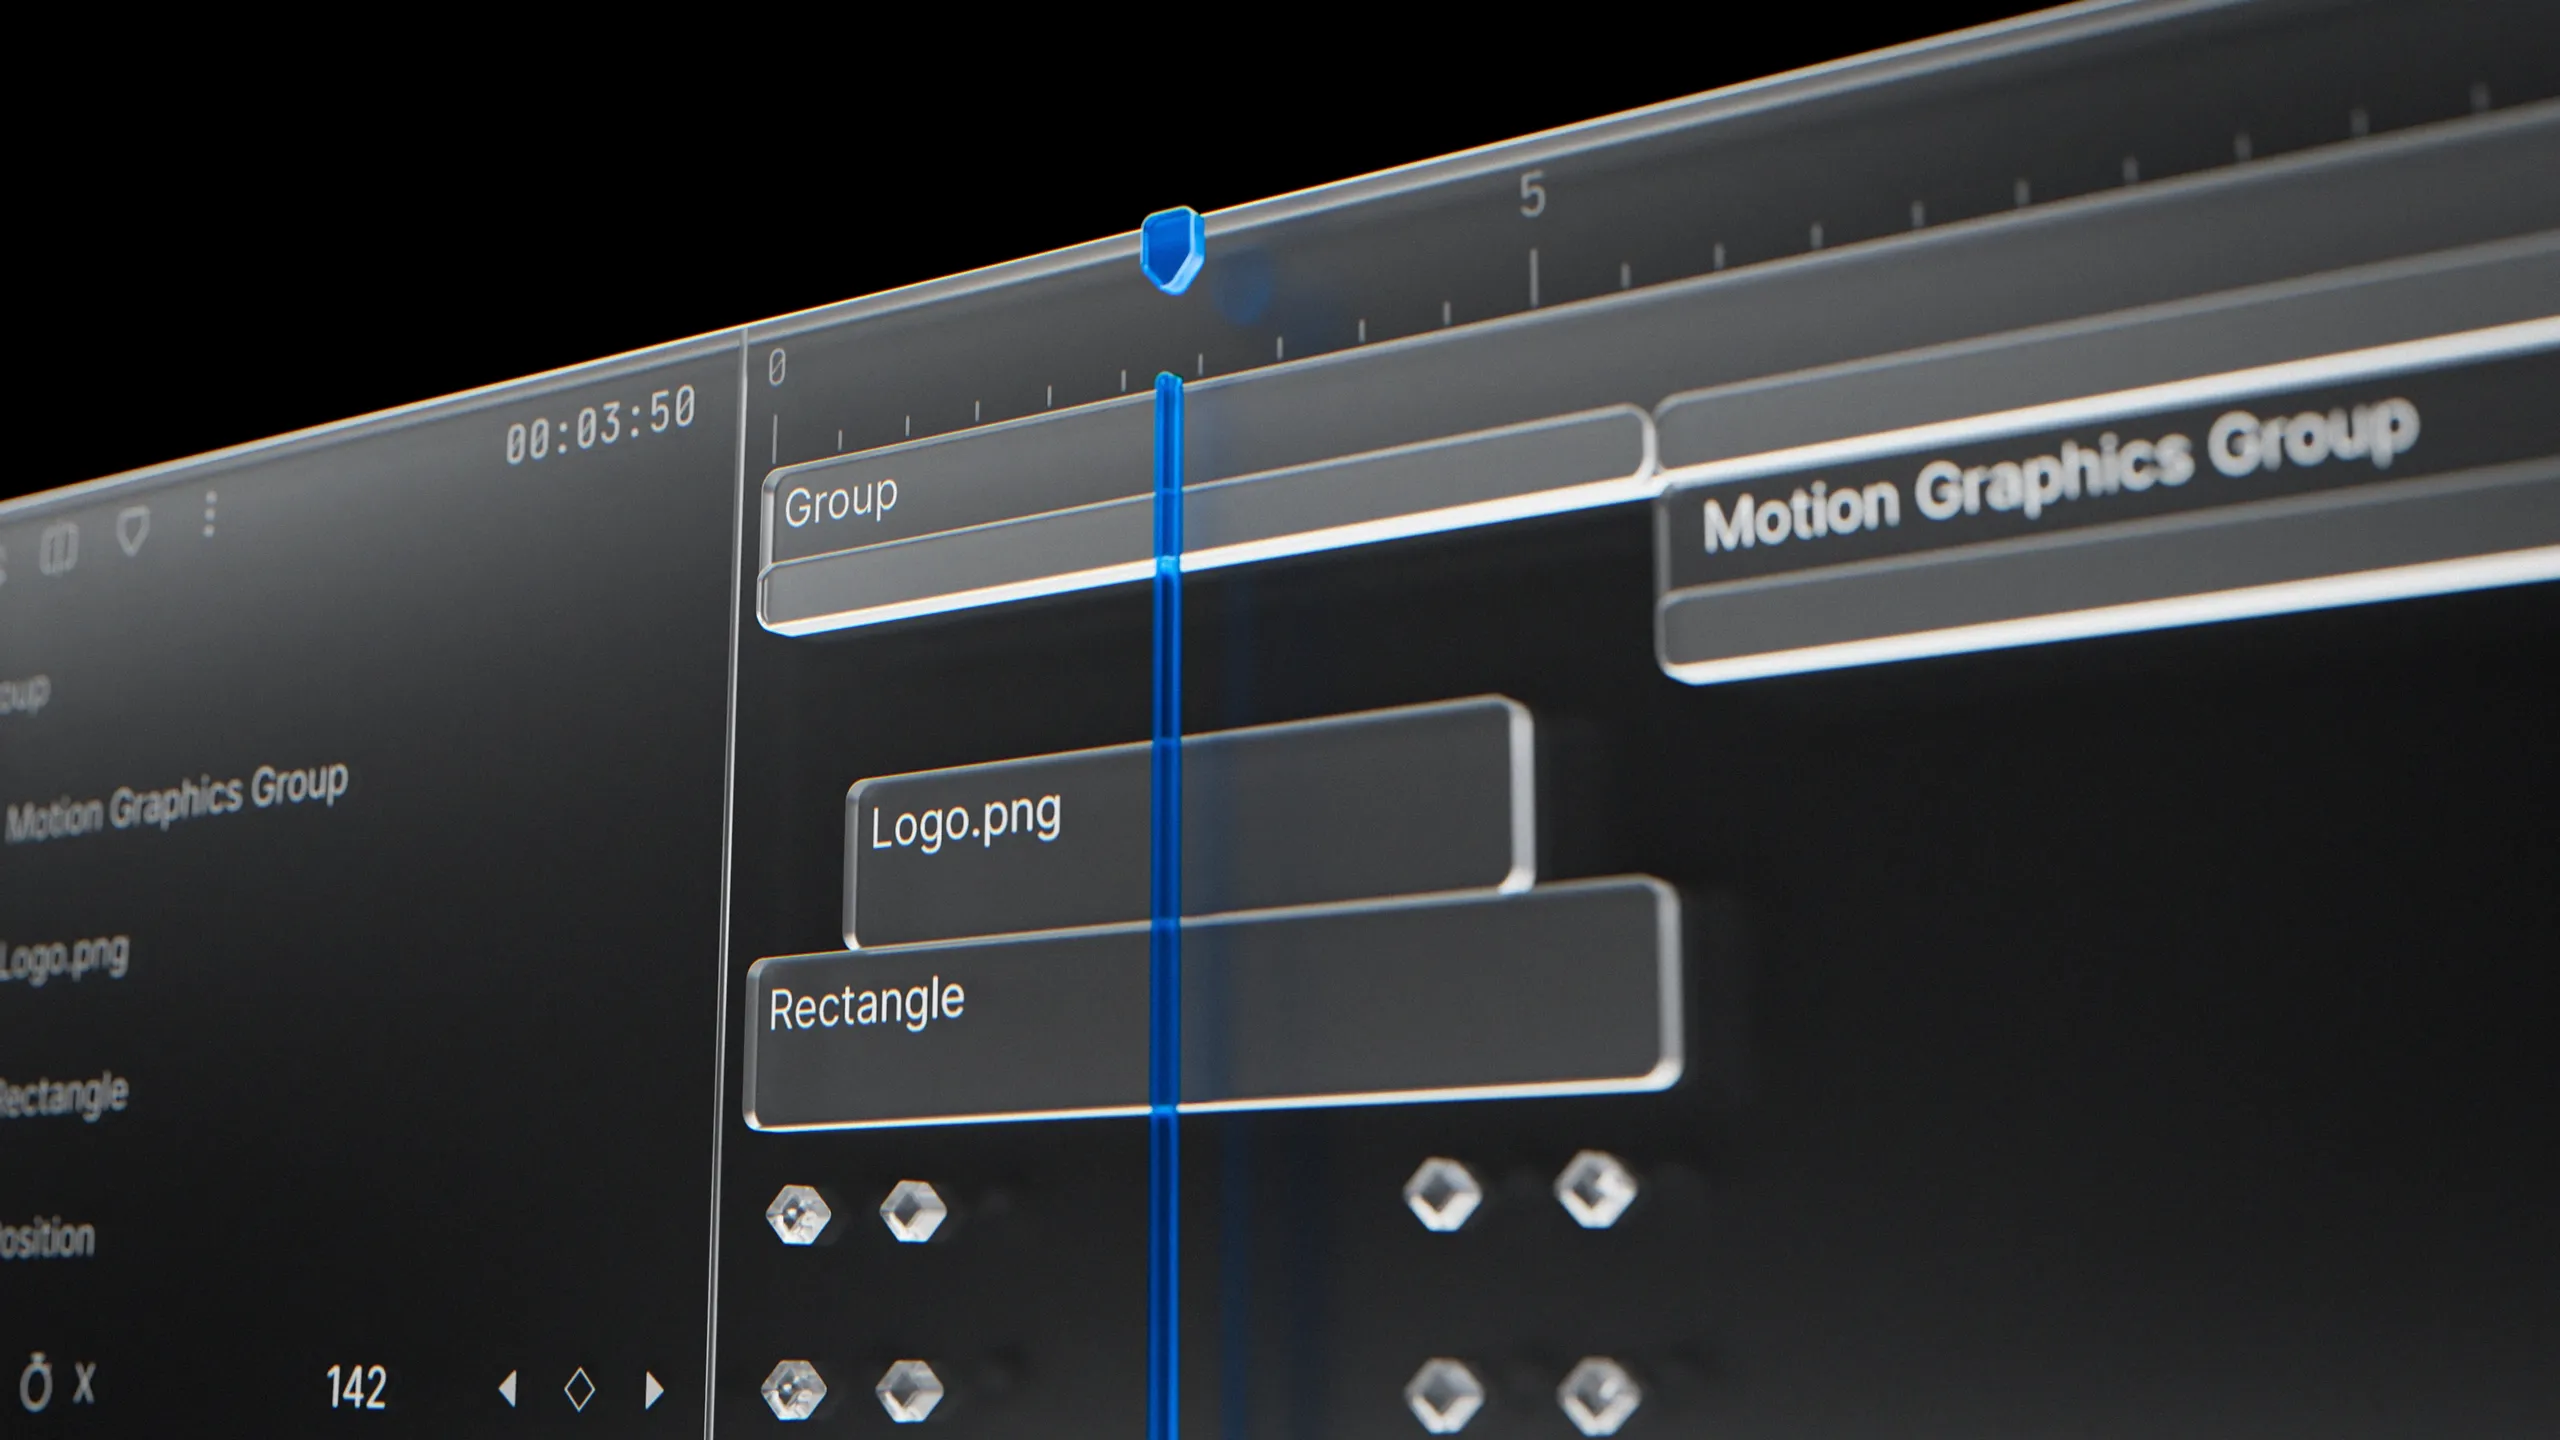
The timeline in Diffusion Studio has been redesigned. The old track-based structure is replaced by layers, with new tools for grouping, sequencing, nested scenes, adjustment layers, and more control over how your projects are organized.
Layers
The timeline now uses layers instead of tracks. Each clip sits on its own layer, and layers can be freely renamed and reordered to control stacking and priority. Give a layer a meaningful name like “Voiceover” or “Lower Third” and find it instantly in a complex project.
You can multi-select layers by dragging on the timeline, making it fast to reorder and reorganize even in dense projects.
Sequences
Layers give each clip its own row, but sometimes you want multiple clips on a single row. That is what sequences are for. Select layers and press ⌘S to combine them into one sequence row. This gives you a hybrid approach: layer-based organization with the ability to line up clips in a shared track when it makes sense.
Splitting a clip also creates a sequence automatically. When you split a media clip, rectangle, or any layer, the result is wrapped into a sequence so the pieces stay on one row. This keeps the traditional NLE editing feel inside the layer-based structure without any extra steps.
Press ⌘⇧G to break a sequence back into individual layers.
Groups
Select any set of layers and press ⌘G to group them. Groups appear as a single collapsible layer on the timeline. Expand a group to see and edit its contents, collapse it to save space and move everything as one unit. Groups can be nested for deeper organization, useful for bundling a title sequence or keeping a video clip paired with its audio.
Press ⌘⇧G to ungroup.
Scenes inside scenes
You can now insert any scene from the canvas into another scene. If you have multiple scenes in a project, drop one inside another to merge, layer, and adjust them together. Nested scenes are expandable on the timeline just like groups. You can add content inside or remove it without flattening anything. This opens up modular, reusable compositions within a single project.
Adjustment layers
A new adjustment layer type is available. It applies transform adjustments across everything beneath it on the timeline, without moving or editing individual elements. Think of it as a camera layer. Currently it supports transform properties. Add one when you need to reposition, scale, or rotate the overall view without touching the underlying layers.
Layer ordering
Reorder layers quickly with keyboard shortcuts. Press ] to bring a layer to the front and [ to send it to the back.
Clip content and trim content
Scenes now have a clip content toggle. Turn it on to hide anything outside the scene boundary. Turn it off to see the full content while editing.
Groups have a similar concept for time. Resize a group’s duration on the timeline, and its contents are trimmed to fit. If you want to undo that trimming, uncheck “Trim content” in the right sidebar under the group’s time section. This lets you extend or shorten a group’s visible duration without permanently cutting what is inside.
Smarter duplication
Hold ⌥ (Option/Alt) to duplicate a selected element, or press ⌘D. Duplication now behaves differently depending on context. Elements on the canvas duplicate to the right of the original. Elements inside a scene duplicate in place, preserving all transform values. This removes the old behavior where duplicates always landed at a fixed offset regardless of context.
Property controller redesign
The property controller, the inline keyframe row that expands under each layer on the timeline, has been redesigned. Individual properties like position, scale, and rotation now have a cleaner layout with easier keyframe navigation and editing.
Timeline visual updates
The timeline has a new, more saturated color palette. Layers are easier to distinguish at a glance, and the overall look is sharper during long editing sessions. Timeline item sizes have been adjusted, and a new smallest size option at 28px height is available for fitting more layers into view.
Masking improvements
The masking feature and its UI have been improved. More masking updates are on the way.
What else is new
- Timeline scroll and zoom performance improvements
- Playhead and scrubbing interactions refined
- Bug fixes and performance improvements across the timeline and platform
- Version 0.126.9
Text animations
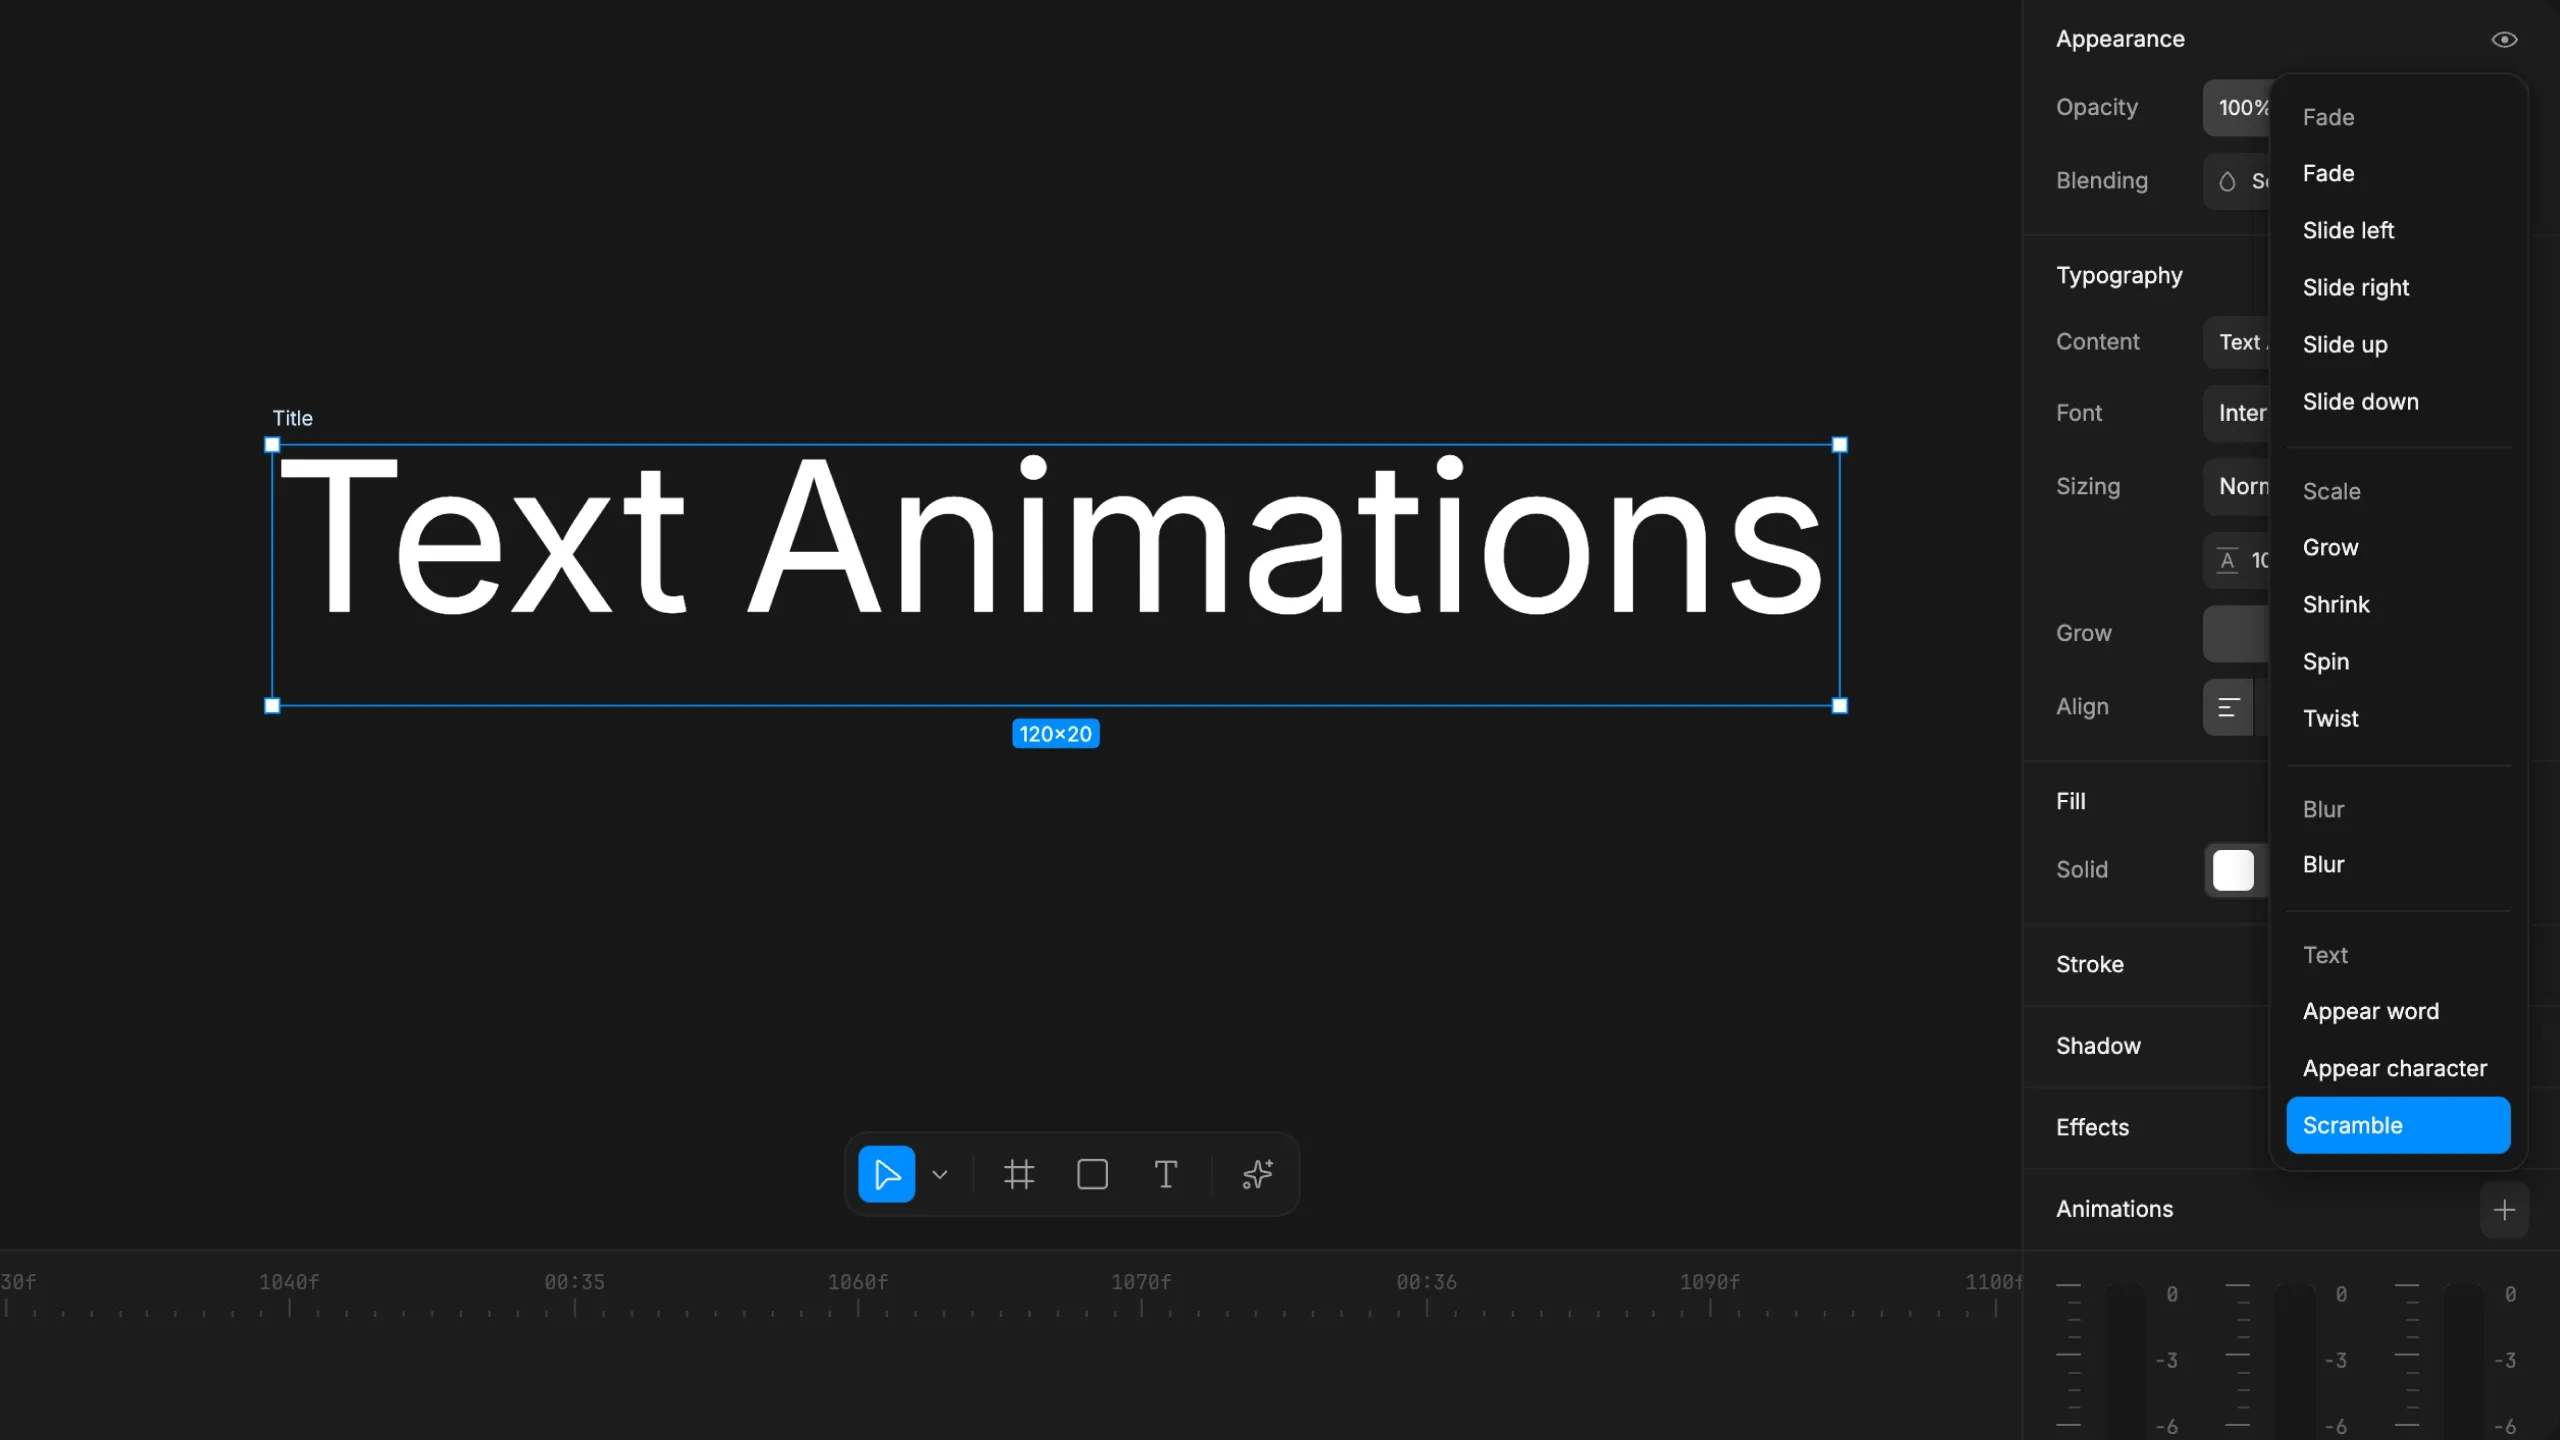 0:00 / 0:00
Text in Diffusion Studio just got a lot more expressive. This update introduces text animations, expanded keyframe support, and a set of editor improvements that make motion work faster and more precise.
Text animations
Three new text-specific animations are available: Appear word, Appear character, and Scramble. Each one gives you fine control over how text enters a scene, whether you want words revealing one at a time, characters typing in sequentially, or a scramble animation that resolves into your final copy.
These join the full animation library, which includes Fade, Slide, Scale, Spin, Twist, and Blur animations. All of them are now stable and work reliably with the new text animations system. Apply them from the animations panel, combine them, and preview instantly on the canvas.
Keyframes for colors and gradients
Keyframes now support colors, gradient stops, and effects. You can animate gradient colors, stop positions, and blend between states over time. Most properties across the editor are now keyframeable, which opens up a much wider range of motion design workflows without leaving Diffusion Studio.
Color input improvements
The color input is smarter. Type a color name like “red”, “blue”, or “white” and it resolves to the right value. Hex input handling is also improved, so partial or shorthand values are normalized automatically.
Resizable timeline
The timeline panel is now freely resizable. Drag to expand it when you need more room for keyframe editing or complex multi-track layouts. Pair it with compact track height to fit more tracks in view for bigger projects or detailed motion work.
What else is new
- Drawing rectangles, scenes, and text on the canvas is improved
- Timeline and playhead interactions have UX refinements
- Tooltips are now available on icon buttons across the sidebar and timeline
- Improved frame rate handling for smoother playback and export
- Export quality and stability improvements
- Bug fixes and performance improvements
- Version 0.125.1
PNG sequence import
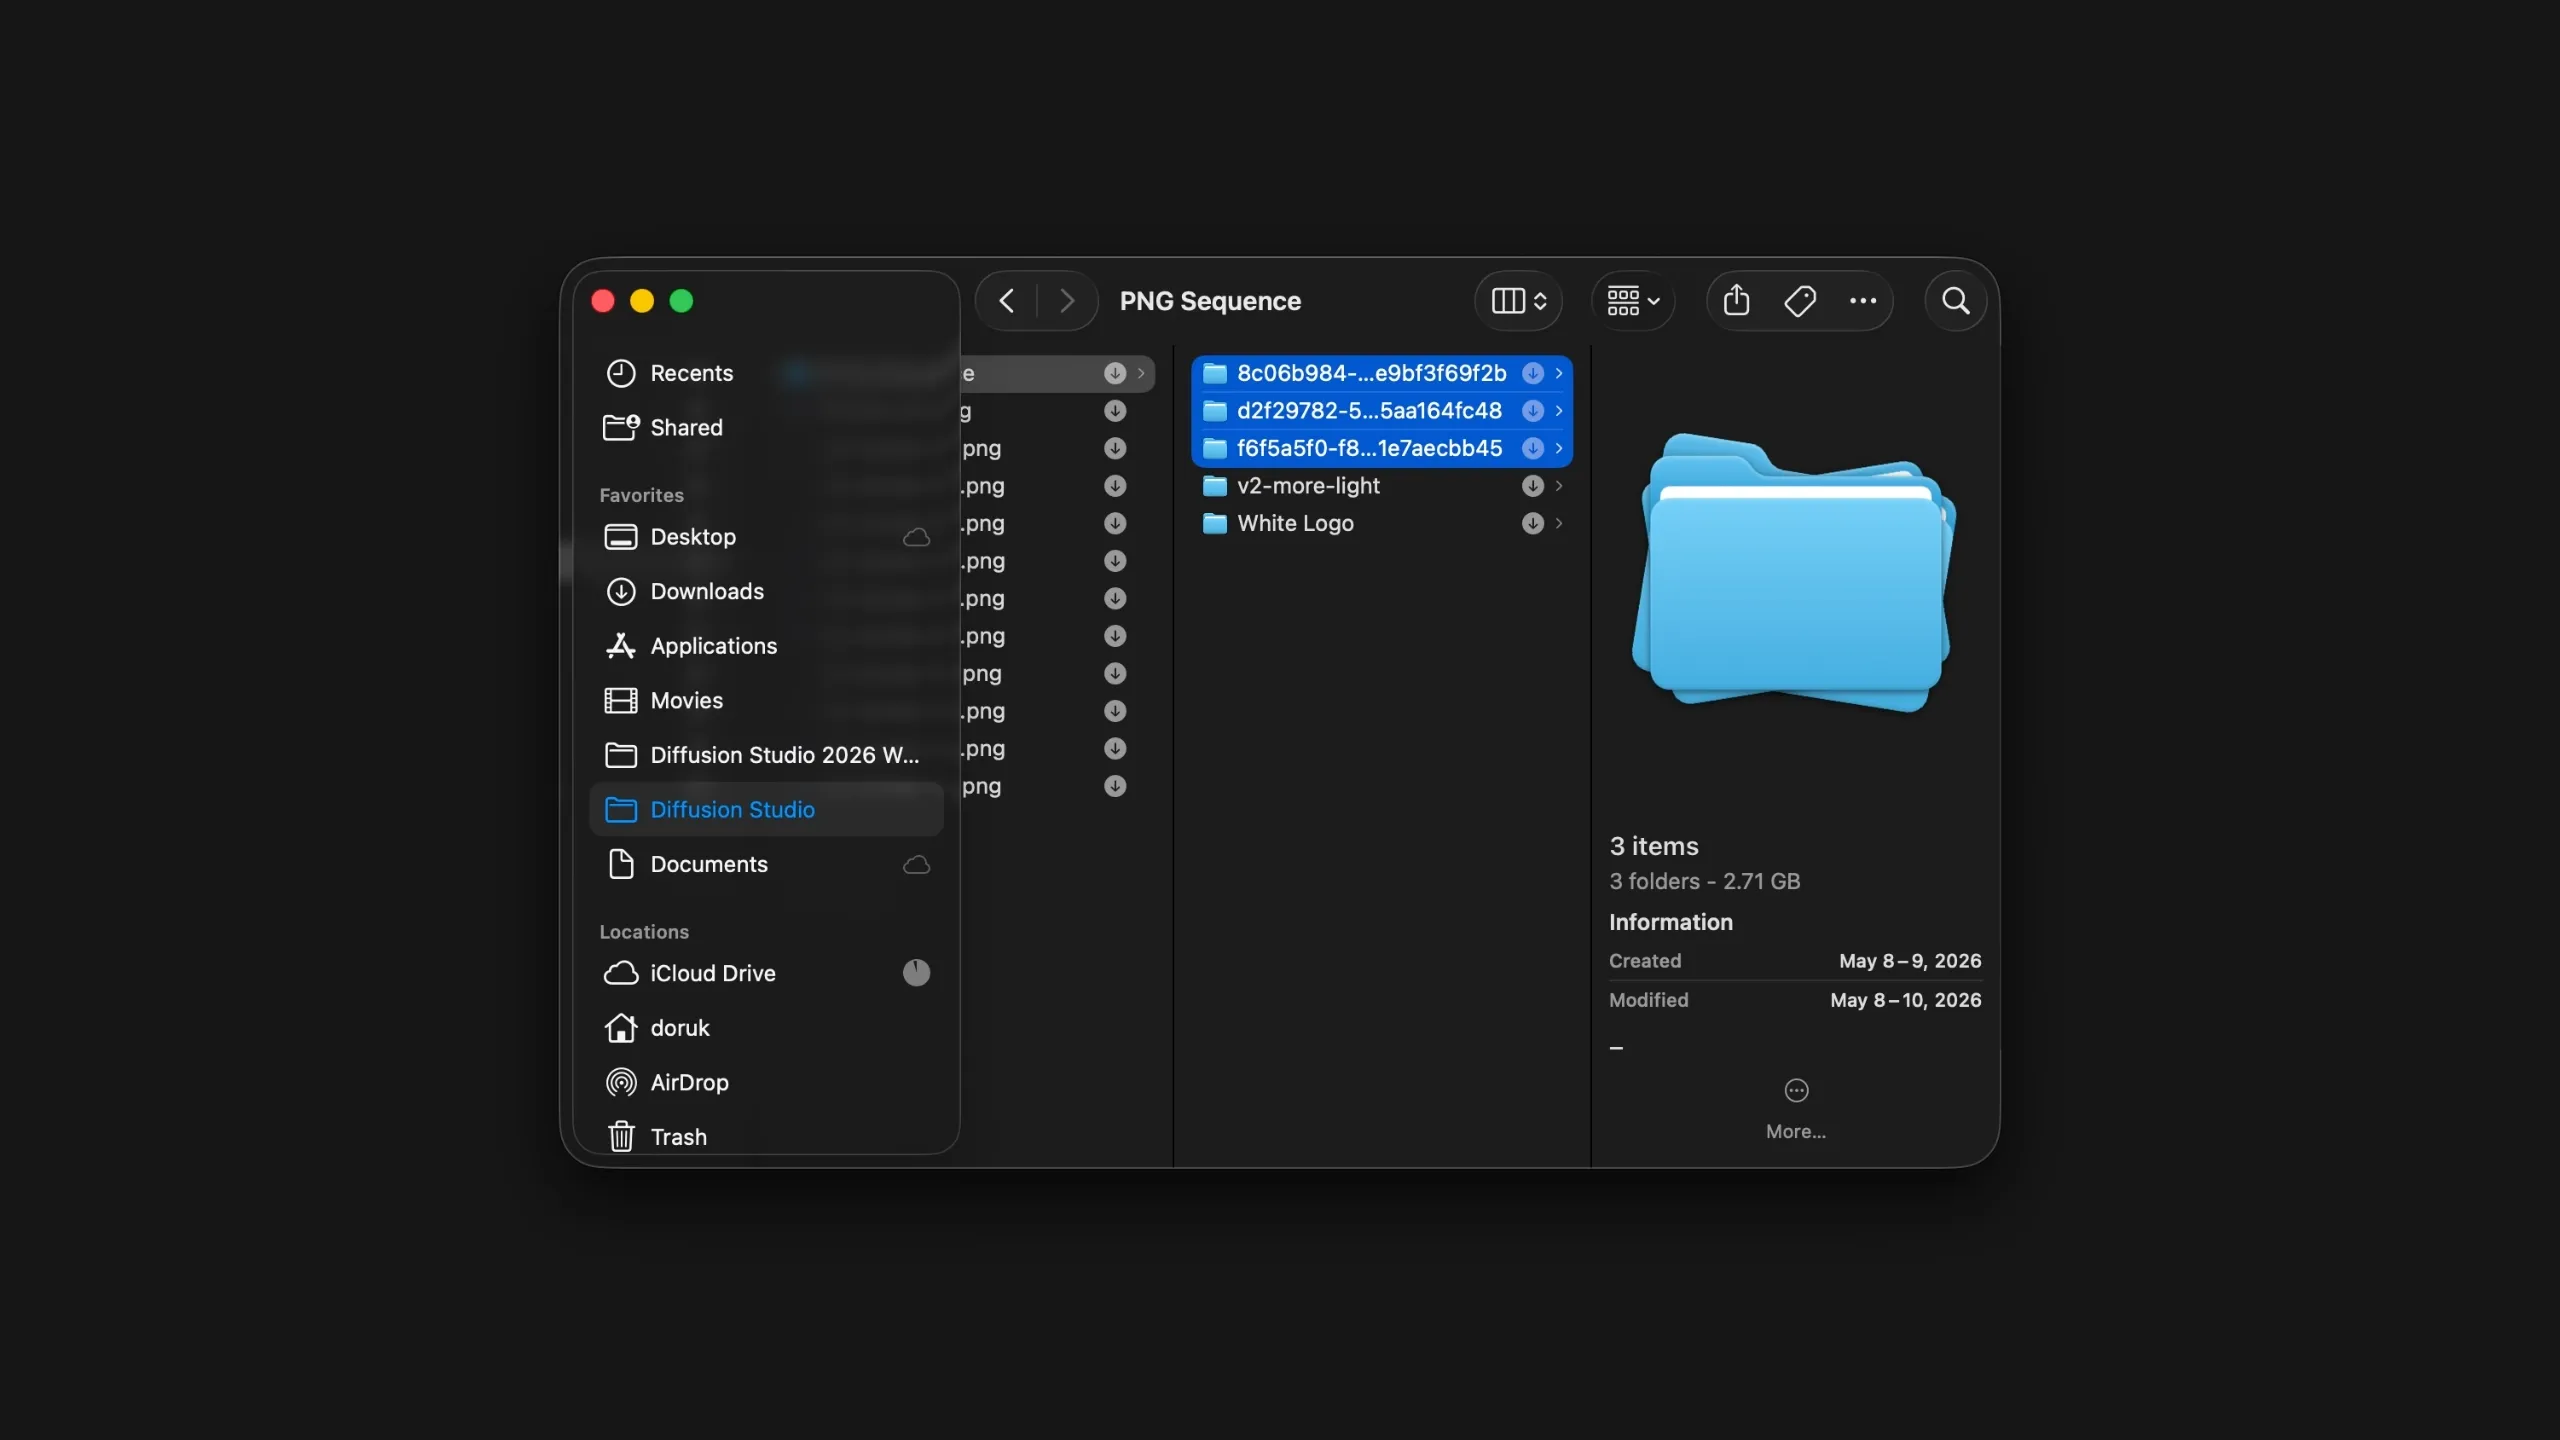 0:00 / 0:00
PNG sequence import is now available in Diffusion Studio.
If you work with tools like Blender or Cinema 4D, you often end up with a folder of numbered frames. Until now, getting those into an editor meant converting to video first, or switching to another tool. That step is gone.
How it works
Drag your PNG sequence folder straight onto the timeline or into your assets panel. Diffusion Studio reads the frames in order and brings them in as a single clip, ready to edit, layer, or export.
Once the sequence is on your timeline, open the time settings in the right sidebar to set the frame rate. Match it to your render output, whether that is 24, 30, or 60 fps.
What else is new
- Performance improvements across the editor
- Bug fixes and stability updates
- Version 0.124.6
Open alpha
 0:00 / 0:00
We’ve been building a newer Diffusion Studio, and today we’re making it available as an Open Alpha.
Video editing hasn’t changed much, and we think it’s overdue for one. Editors still center around the same timeline-and-bins structure, and anything beyond basic cuts usually means switching to another tool. We set out to build a non-linear editing experience with full creative control where everything you need is in one place.
Every idea starts on a canvas. A sketch, a blank page, a space to explore before structure takes over. Diffusion Studio is built around that. Your scenes, assets, and compositions live together on an infinite canvas. You can see the full scope of a project, move between ideas freely, and switch to the timeline when you need sequencing and precision. One environment from import to export, no tool switching.
AI has been part of Diffusion Studio before, but we’ve rebuilt it for this release. Auto-captions, generation, and smart actions run inside the editor as part of the workflow, not a separate step.
We’re also working on Diffusion Studio for Mac, with MCP support so AI agents can work alongside your editing workflow. More on that soon.
This is an alpha. Things will change and some will break. We’re shipping early because building in the open gets us there faster.
It’s ready. Open Diffusion Studio and share what you make with us on X.
Looking for the previous editor? If you have existing projects or need to download assets, you can access the legacy editor.